CentOS7 配置L2TP、IPSEC VPN和vnstat流量监控
配置步骤
# yum install epel-release           #安装epel源
# yum install gcc libreswan xl2tpd       #安装配置ipsec所需软件包,其中libreswan提供ipsec服务,xl2tpd提供L2TP服务
# vim /etc/ipsec.conf
# /etc/ipsec.conf - Libreswan IPsec configuration file
#This file:  /etc/ipsec.conf
config setup
  protostack=netkey
  nat_traversal=yes   #增加此行,允许穿透nat建立l2tp连接
virtual_private=%v4:10.0.0.0/8,%v4:192.168.0.0/16,%v4:172.16.0.0/12,%v4:25.0.0.0/8,%v4:100.64.0.0/10,%v6:fd00::/8,%v6:fe80::/10
# vim /etc/ipsec.d/l2tp_psk.conf #新建ipsec与l2tp服务关联的配置文件,输入以下内容并保存。用VPS公网IP地址替换your.vps.ip.addr
conn L2TP-PSK-NAT
rightsubnet=vhost:%priv
also=L2TP-PSK-noNAT
conn L2TP-PSK-noNAT
authby=secret
pfs=no
auto=add
keyingtries=3
dpddelay=30
dpdtimeout=120
dpdaction=clear
rekey=no
ikelifetime=8h
keylife=1h
type=transport
left=your.vps.ip.addr #left=vps公网IP地址
leftprotoport=17/1701
right=%any
rightprotoport=17/%any# vim /etc/ipsec.secrets #检查预共享密匙配置文件,默认已存在。
include /etc/ipsec.d/*.secrets
# vim /etc/ipsec.d/l2tp_vpn.secrets #新建VPN账号密码配置文件,输入vps外网IP,连接源,连接方式,账号和密码。
your.vps.ip.addr %any: PSK "password"
# vim /etc/sysctl.conf #修改内核支持sysctl.conf文件,输入以下内容。
net.ipv4.ip_forward = 1
net.ipv4.conf.all.rp_filter = 0
net.ipv4.conf.default.rp_filter = 0
net.ipv4.conf.eth0.rp_filter = 0
net.ipv4.conf.eth0.send_redirects = 0
net.ipv4.conf.eth0.accept_redirects = 0
net.ipv4.conf.all.send_redirects = 0
net.ipv4.conf.default.send_redirects = 0
net.ipv4.conf.all.accept_redirects = 0
net.ipv4.conf.default.accept_redirects = 0# sysctl -p #使配置立即生效
# systemctl start ipsec #启动ipsec服务
# systemctl enable ipsec #设置ipsec服务自启动
# ipsec verify #检查ipsec配置是否正确,如果全部OK即正常。其中Hardware random device [N/A],Opportunistic Encryption [DISABLED]为正常。
# vim /etc/xl2tpd/xl2tpd.conf
[global]
 ipsec saref = yes   #启用xl2tpd的ipsec支持
 listen-addr = your.vps.ip.addr   #配置对外提供连接的服务器地址
 [lns default]
 ip range = 192.168.1.101-192.168.1.200   #设置建立连接时分配给客户端的IP地址
 local ip = 192.168.1.99   #不要将local ip包含在ip range内
 require chap = yes
 refuse pap = yes
 require authentication = yes
 name = l2tp_server
 ppp debug = yes
 pppoptfile = /etc/ppp/options.xl2tpd
 length bit = yes
# vim /etc/ppp/options.xl2tpd
require-mschap-v2 #用于支持win7/win8连接
ipcp-accept-local
ipcp-accept-remote
ms-dns 8.8.8.8
ms-dns 8.8.4.4
noccp
auth
crtscts
idle 1800
mtu 1410
mru 1410
nodefaultroute
hide-password
name l2tpd
debug
lock
proxyarp
connect-delay 5000# vim /etc/ppp/chap-secrets #配置账号密码,其中your.account为账号,your.password为密码。
#Secrets for authentication using CHAP
#client server secret IP addresses
your.account l2tpd your.password *# systemctl start xl2tpd #启动l2tpd服务
# systemctl enable xl2tpd #设置l2tpd服务自启动
# vim /usr/lib/firewalld/services/l2tpd.xml #定义l2tpd服务和端口<?xml version="1.0" encoding="utf-8"?>
<service>
<short>l2tpd</short>
<description>L2TP IPSec</description>
<port protocol="udp" port="500"/>
<port protocol="udp" port="4500"/>
<port protocol="udp" port="1701"/>
</service># firewall-cmd --permanent --add-service=l2tpd
# firewall-cmd --permanent --add-service=ipsec
# firewall-cmd --permanent --add-masquerade
# firewall-cmd --permanent --direct --add-rule ipv4 filter FORWARD 0 -p tcp -i ppp+ -j TCPMSS --syn --set-mss 1356
# firewall-cmd --reload安装vnstat监控流量并配置vnstat PHP frontend
统计CentOS7的流量使用情况
# yum install vnstat #安装vnstat软件vnstat --create -i eth0 #生成需要统计的网卡的数据库
vnstat -u -i eth0 #更新数据库
vnstat -l #查看当前实时流量
vnstat -h #查看每小时流量统计
vnstat -d #查看每天流量统计
vnstat -w #查看每周流量统计
vnstat -m #查看每月流量统计
vnstat #查看流量报表
vnstat -l -i eth0 -ru #查看具体某个网卡实时流量
注:-ru表示将显示单位在bytes和bits之间切换,可省略。
# vim /etc/cron.d/vnstat        #配置计划任务,每分钟更新一次数据库
*/1 * * * * root /usr/bin/vnstat -u -i eth0
# vim /etc/vnstat.conf
#how units are prefixed when traffic is shown
#0 = IEC standard prefixes (KiB/MiB/GiB/TiB)
#1 = old style binary prefixes (KB/MB/GB/TB)
UnitMode 1 #以KB/MB/GB单位显示
#used rate unit (0 = bytes, 1 = bits)
RateUnit 1 #以bits单位显示Systemctl start vnstat
systemctl enable vnstat# vnstat -tr 10 -ru #计算一段时间内的流量平均值,默认为5秒
# vnstat --help #查看帮助信息
vnStat 1.15 by Teemu Toivola <tst at iki dot fi>
-q, --query query database
-h, --hours show hours
-d, --days show days
-m, --months show months
-w, --weeks show weeks
-t, --top10 show top 10 days
-s, --short use short output
-u, --update update database
-i, --iface select interface (default: eth0)
-?, --help short help
-v, --version show version
-tr, --traffic calculate traffic
-ru, --rateunit swap configured rate unit
-l, --live show transfer rate in real time
See also "--longhelp" for complete options list and "man vnstat".配置vnstat PHP frontend
# wget http://www.sqweek.com/sqweek/files/vnstat_php_frontend-1.5.1.tar.gz
# tar zxvf vnstat_php_frontend-1.5.1.tar.gz
# mv vnstat_php_frontend-1.5.1 /usr/share/nginx/html/vnstat
# vim /usr/share/nginx/html/vnstat/config.php
<?php
error_reporting(E_ALL | E_NOTICE);
$locale = 'en_US.UTF-8';
$language = 'en'; #修改为en
$iface_list = array('eth0'); #删除SixXS IPV6组
$iface_title['eth0'] = 'Internal';
#$iface_title['sixxs'] = 'SixXS IPv6'; #屏幕IPV6的接口信息
$vnstat_bin = '/usr/bin/vnstat';
$data_dir = '/var/lib/vnstat/'; #修改vnstat数据库目录
$graph_format='png'; #修改为png格式
define('GRAPH_FONT',dirname(__FILE__).'/VeraBd.ttf');
define('SVG_FONT', 'Verdana');
define('DEFAULT_COLORSCHEME', 'light');
?># vim /usr/share/nginx/html/vnstat/vnstat.php删除vnstat_dump_字符
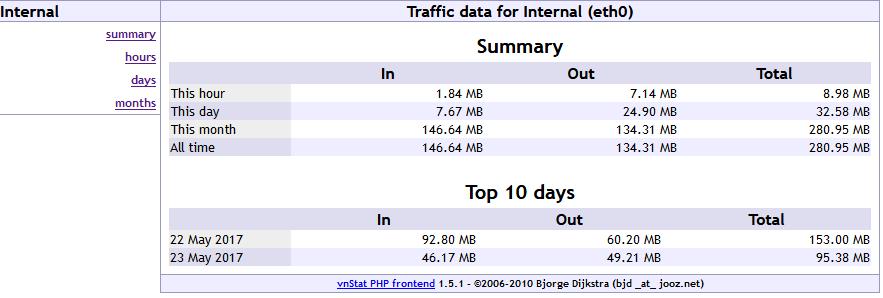
http://your.website.com/vnstat即可直接访问
最后更新于 2020-10-30 09:06:31 并被添加「l2tp vpn vnstat」标签,已有 7516 位童鞋阅读过。
本站使用「署名 4.0 国际」创作共享协议,可自由转载、引用,但需署名作者且注明文章出处
此处评论已关闭