CentOS7 LNMP+typecho环境搭建个人博客
搭建步骤
1、选择个人喜欢的vps或局域网安装centos7
配置本地yum源,IP地址,主机名(局域网环境),安装vim、bash-completion(个人爱好,可省略)。
若未配置网络连接,需使用nmcli命令手动配置IP地址。
# yum install vim bash-completion
# nmcli con mod ens160 ipv4.address 10.100.0.5/24    #修改IP地址
# nmcli con mod ens160 ipv4.gateway 10.100.0.1        #修改网关
# nmcli con mod ens160 ipv4.dns 10.100.0.1        #修改DNS
# nmcli con mod ens160 ipv4.method manual        #修改IP为手动配置
# nmcli con mod ens160 connection.autoconnect yes    #启用网卡开机自动连接
# nmcli con up ens160                        #启用网卡连接
# ip addr show ens160                        #查看修改后的IP地址
# hostnamectl set-hostname iorisun            #修改主机名
# timedatectl set-timezone Asia/Shanghai        #配置亚洲上海时区
# vim /etc/hosts                    #增加DNS记录
增加一行10.100.0.5 iorisun www.iorisun.com
vps环境在安装centos时可指定主机名,添加DNS记录时注意使用公网IP。
2、配置SSH和vmtools(可省略)
# yum install open-vm-tools                #虚拟机环境,其他环境省略
# vim /etc/ssh/sshd_config                #可省略
在#Port 22下面另起一行,例如增加Port 3322。
# firewall-cmd --zone=public --add-port=3322/tcp --permanent
# firewall-cmd --reload
# yum install policycoreutils-python                #开启SELinux环境,其他环境省略
# semanage port -a -t ssh_port_t -p tcp 3322
# systemctl restart sshd                        #重启后原默认端口将不再可用
使用3322端口重新登录Server。
# ssh -l root –p 3322 www.iorisun.com            #使用linux客户端连接
或使用pshell连接
3、安装LNMP(Linux+Nginx+MySQL+PHP)
1>.安装Nginx
# yum install wget
# wget http://nginx.org/packages/centos/7/noarch/RPMS/nginx-release-centos-7-0.el7.ngx.noarch.rpm
# rpm -ivh nginx-release-centos-7-0.el7.ngx.noarch.rpm            #创建nginx的yum仓库
# yum install nginx                            #安装nginx
# systemctl start nginx                            #启动nginx
# systemctl enable nginx                        #设置开机自动启动nginx
# firewall-cmd --zone=public --add-service=http --permanent    #添加http端口
# firewall-cmd --reload                        #重加载防火墙配置
# firewall-cmd --zone=public --list-all #查看已开的端口打开http://10.100.0.5将看到"Welcome to nginx!"页面,说明nginx安装成功。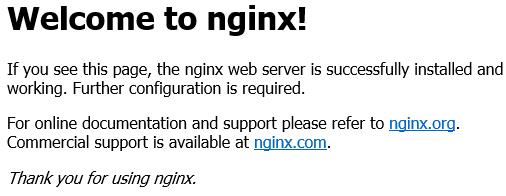
注:vps需把私有IP地址改为域名或公网IP地址,以下类同。
2>.安装Mariadb(10.1):
# vim /etc/yum.repos.d/mariadb.repo        #新建yum库
输入以下内容:
#MariaDB 10.1 CentOS repository list - created 2017-04-24 09:32 UTC
#http://downloads.mariadb.org/mariadb/repositories/
[mariadb]
name = MariaDB
baseurl = http://yum.mariadb.org/10.1/centos7-amd64
gpgkey=https://yum.mariadb.org/RPM-GPG-KEY-MariaDB
gpgcheck=1
# yum install MariaDB-server MariaDB-client
注:国内Yum下载速度非常慢,可以下载RPM包安装:
先yum安装较小的依赖包:
# yum install lsof rsync perl-DBI boost-program-options jemalloc MariaDB-shared
再rpm下载安装较大的包:
下载地址:https://mirrors.tuna.tsinghua.edu.cn/mariadb/mariadb-10.1.22/yum/rhel7-amd64/rpms
# rpm -ivh galera-25.3.19-1.rhel7.el7.centos.x86_64.rpm
# rpm -ivh MariaDB-10.1.22-centos7-x86_64-client.rpm
# rpm -ivh MariaDB-10.1.22-centos7-x86_64-server.rpm
# systemctl start mariadb #启动mariadb
# mysql_secure_installation #根据提示配置密码和安全选项
# mysqladmin -uroot password '12345678' #若上一步修改了密码则此步可省略
# systemctl restart mariadb #重启数据库3>.安装PHP
# yum install php php-devel php-fpm php-gd php-mbstring php-mysql
# systemctl start php-fpm
# systemctl enable php-fpm
# netstat -tln|grep 9000              #php-fpm默认使用9000端口,查看端口使用情况:
# yum install net-tools             #如果没有netstat命令则需要安装net-tools工具包
安装说明:
Nginx:提供nginx主程序
Mariadb:提供MySQL客户端程序
Mariadb-server:提供MySQL服务器程序
Php:PHP主程序含给apache使用的模块
Php-devel:PHP的发展工具,这个与PHP外挂的加速软件有关
Php-mysql:提供给PHP程序读取mysql数据库的模块
php-gd:php处理图形的扩展库,使用GD库可以处理图片或生成图片。如验证码
php-mbstring:扩展库,用于处理多字节字符串
php-fpm:使用PHP-FPM来控制PHP-CGI的FastCGI进程
4、配置Nginx
# vim /etc/php-fpm.d/www.conf #修改php-fpm配置文件,把apache改为nginx
# vim /etc/nginx/conf.d/default.conf配置location,在index中添加index.php。以支持index.php的首页:
配置php请求被传送到后端的php-fpm模块,默认情况下php配置块是被注释的,此时去掉注释并修改为以下内容:
默认配置,
把\.php$改为.*\.php(\/.*)*$,
把root中的html改为/usr/share/nginx/html,
把fastcgi_param中的/scripts改为$document_root。root是配置php程序放置的根目录。
保存后,重启nginx服务
# systemctl restart nginx5、配置PHP
# vim /etc/php.ini        #修改PHP配置文件
date.timezone = PRC        #取消前面的;,修改为PRC
expose_php = Off        #禁止显示php版本的信息
short_open_tag = On        #取消前面的;,修改为On。表示支持php短标签
6、测试
通过http://10.100.0.5/phpinfo.php查看php模块是否正常,测试后删除
# vim phpinfo.php        #在首页目录(/usr/share/nginx/html)新增,测试php
<?php
 phpinfo();
?>通过http://10.100.0.5/test.php查看mysql数据库连接是否正常,测试后删除
# vim test.php        #新增test.php(名字随意),测试mysql连接
<?php $link=mysql_connect('127.0.0.1','root','12345678');
 if($link) echo "connect successs!";
 else echo "connect fail!"; ?>
在开启SELinux情况下,php连接mysql测试会失败。
# getsebool -a |grep httpd                #检查httpd进程的许可模式
可以看到httpd_can_network_connect --> off
# setsebool -P httpd_can_network_connect=1            #开启连接后即可测试正常。
7、安装Typecho
# wget https://github.com/typecho/typecho/releases/download/v1.0-14.10.10-release/1.0.14.10.10.-release.tar.gz
# tar zxvf 1.0.14.10.10.-release.tar.gz
# cp -r build/* /usr/share/nginx/html/
# mysql -uroot -p
> create database typecho;                #新建数据库
> grant all privileges on typecho.* to dbadmin@localhost identified by ‘87654321’; #新建数据库连接用户在浏览器输入http://10.100.0.5/install.php,开始配置typecho博客: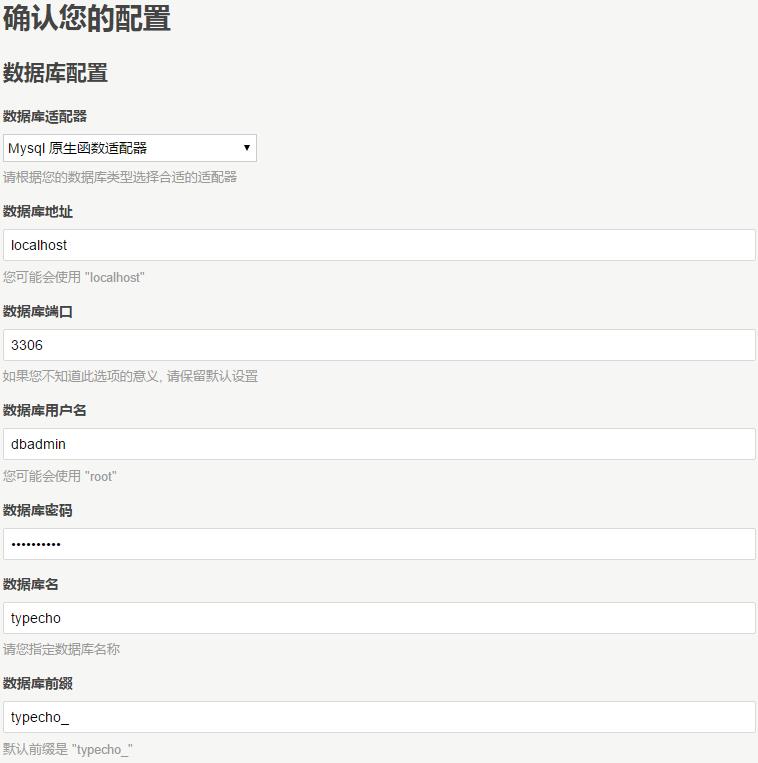
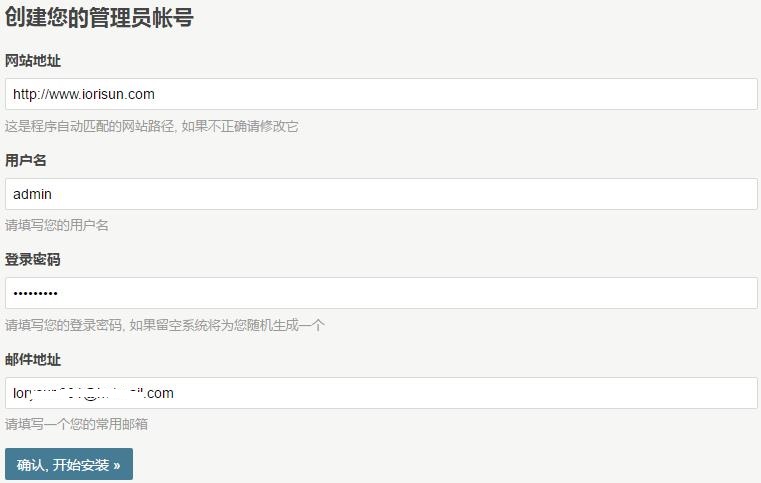
发布到公网,需要把网站地址改为网站域名http://www.iorisun.com
安装完成即可。此时除首页外,其他页面访问均出现404错误。解决办法:
# vim /etc/nginx/conf.d/default.conf
把location ~ \.php$改为.*\.php(\/.*)*$,保有存即可。
# mv index.html index.html.bak    #删除或修改index.html文件名
8、更换主题(Junichi)
Junichi主题地址:https://github.com/siseboy/junichi
# wget https://codeload.github.com/siseboy/junichi/zip/master -O junichi.zip
# yum install unzip
# unzip junichi.zip
# mv junichi-master /usr/share/nginx/html/usr/themes/junichi
1>.启用主题:
登录后台,控制台-->外观,选择相关主题,启用即可。
注意:在开启selinux情况下,启用主题后主页会显示空白,需要修改上下文。
# semanage fcontext -a -t httpd_sys_content_t '/usr/share/nginx/html/usr/themes(/.*)?'
# restorecon -RFvv themes/
或直接一条命令:
# chcon -R -t httpd_sys_rw_content_t /usr/share/nginx/html/usr/themes
2>.设置主题:
启用静态地址重写功能:
vim /etc/nginx/conf.d/default.conf增加和修改以下内容: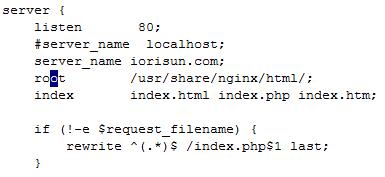
注:不增加以上代码,则以下重写功能修改保存不了。
修改完成重启nginx,登录后台:
设置-->永久链接,选择启用。保存设置。如下图:
修改外观:
控制台-->外观-->设置外观:
<1>.logo下边的标语:自定义(如新手博客)
<2>.Favicon:定义浏览器图标
<3>.头像:个人头像
<4>.左侧背景图:博客左侧背景,234不设置将使用主题自带图片,可直接替换images目录下的图片。
<5>.设置开启Pjax:勾选“启用Pjax加速站点”,保存设置。再到“设置-->评论”,取消“开启反垃圾保护”选项。保存设置。
<6>.微博、GitHub、Twitter、Google+、微信、QQ、音乐链接:根据个人需求设置。
<7>.附件存放链接:根据需求设置,如使用七牛云存储域名空间。节省个人博客空间和流量。
设置单页:
管理-->独立页面:
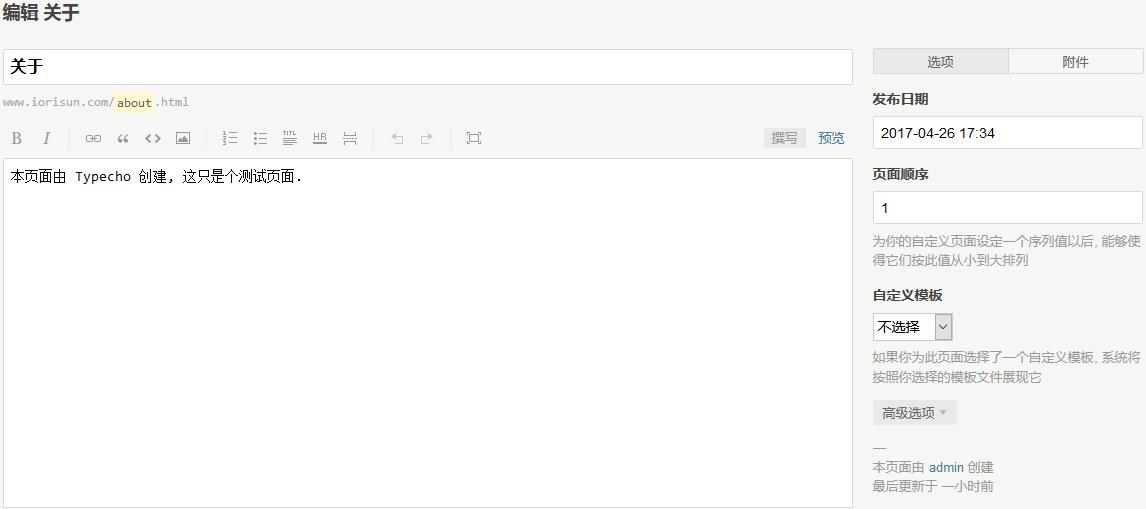
修改“关于”页面,将缩略名命名为about,建立关于单页;
新增“归档”页面,将缩略名命名为archives,自定义模板选择archives,建立归档页;
新增“友链”页面,将缩略名命名为links,自定义模板选择links,建立友链页。
因为 Typecho 的编辑器原因,友情链接部分需要直接编辑源文件来增加或删除。
# vim /usr/share/nginx/html/usr/themes/junichi/page-links.php
9、其他问题
附件上传失败的问题:
在uploads目录下新建一个文件保存目录并修改权限为777。
# mkdir /usr/share/nginx/html/usr/uploads/2017
# chmod 777 /usr/share/nginx/html/usr/uploads/2017
再次上传就正常了。
隐藏nginx版本信息:
Nginx的版本号主要在两个地方会有:
第一个是HTTP header,有个Server:nginx/1.x.x类似会暴露Web服务器所用软件名称以及版本号。 
第二个地方是Nginx出错页面,比如404页面没有找到等。
解决办法:
对于这两个地方的版本号隐藏,Nginx都提供了简单的办法一步到位,参考server_tokens。通过在配置文件的http节配置server_tokens off来达到我们目的。
# vim /etc/nginx/nginx.conf
在http {}里增加server_tokens off;配置。
http {
 …
 keepalive_timeout  65;
 server_tokens   off;
 …
}
# vim /etc/nginx/fastcgi_params把nginx/$nginx_version改为nginx,如下:
修改并重启nginx后:
最后更新于 2021-10-08 21:26:24 并被添加「lnmp typecho」标签,已有 6556 位童鞋阅读过。
本站使用「署名 4.0 国际」创作共享协议,可自由转载、引用,但需署名作者且注明文章出处